Greetings,
In my last guide, I walked through how to install the WDS role, click here to view Part 1.Today, I will be demonstrating how to add a WDS server and configure some of the properties.
Lets get started shall we?
Configuring WDS:
Once you have the WDS role installed, the next steps are to configure WDS for PXE, AD DS, and DHCP.
Note: Keep in mind that I have WDS installed on a separate server, but on the same VLAN (Virtual Local Area Network) as the DHCP server. This way WDS doesn't have to go a search for PXE. You can have WDS and DHCP on the same server which will help with the simplicity of things. You can even have them on separate servers and VLANS, the only con of this is you'll have more configuration to do.
1) Login to the WDS server:

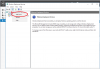
2) When Server Manager launches, click on WDS on the left hand side:

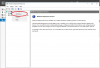
3) On the highlighted server, right click and choose "Windows Deployment Services Management Console":

4) On the left hand side where it says "Servers", right click and choose add server, this will open the Windows Services Deployment Console where you can create and maintain Windows boot, capture, and install images:

5) On the add servers window, leave as default and click Ok:

6) Right Click on the server and choose Configure Server:

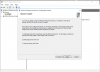
7) On the "Before you begin" window, click Next:

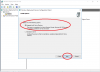
8) On the "Install Options" window, leave as default since the server is a member of a domain:
Note: It is preferred to use Integrated with Active Directory to make administering, managing, and imaging a lot easier.

9) On the "Remote Installation Folder Location" window, choose where you want to store your boot, capture, and install images. In this demonstration, we will save them on C: volume, click Next:

Note: If you leave the option as default, Windows will prompt you its best to store them on a separate volume:

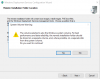
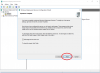
10) On the "PXE Server Initial Settings" window, select "Respond to all client computers (known and unknown) and click Next:

11) Click Finish:

Once you have gone through the wizard, you will notice that have a green arrow next to your server name. This means that the WDS service is currently online and is ready to be used:

Congratulations, you have just learned how to configure WDS! Keep an eye out for my next part guide which will show you how to create a boot image, capture image, and install image!
And of course, if you have any questions, comments, or concerns, please don't hesitate to contact me!
Sincerely,
Mog
In my last guide, I walked through how to install the WDS role, click here to view Part 1.Today, I will be demonstrating how to add a WDS server and configure some of the properties.
Lets get started shall we?
Configuring WDS:
Once you have the WDS role installed, the next steps are to configure WDS for PXE, AD DS, and DHCP.
Note: Keep in mind that I have WDS installed on a separate server, but on the same VLAN (Virtual Local Area Network) as the DHCP server. This way WDS doesn't have to go a search for PXE. You can have WDS and DHCP on the same server which will help with the simplicity of things. You can even have them on separate servers and VLANS, the only con of this is you'll have more configuration to do.
1) Login to the WDS server:
2) When Server Manager launches, click on WDS on the left hand side:
3) On the highlighted server, right click and choose "Windows Deployment Services Management Console":
4) On the left hand side where it says "Servers", right click and choose add server, this will open the Windows Services Deployment Console where you can create and maintain Windows boot, capture, and install images:
5) On the add servers window, leave as default and click Ok:
6) Right Click on the server and choose Configure Server:
7) On the "Before you begin" window, click Next:
8) On the "Install Options" window, leave as default since the server is a member of a domain:
Note: It is preferred to use Integrated with Active Directory to make administering, managing, and imaging a lot easier.
9) On the "Remote Installation Folder Location" window, choose where you want to store your boot, capture, and install images. In this demonstration, we will save them on C: volume, click Next:
Note: If you leave the option as default, Windows will prompt you its best to store them on a separate volume:
10) On the "PXE Server Initial Settings" window, select "Respond to all client computers (known and unknown) and click Next:
11) Click Finish:
Once you have gone through the wizard, you will notice that have a green arrow next to your server name. This means that the WDS service is currently online and is ready to be used:
Congratulations, you have just learned how to configure WDS! Keep an eye out for my next part guide which will show you how to create a boot image, capture image, and install image!
And of course, if you have any questions, comments, or concerns, please don't hesitate to contact me!
Sincerely,
Mog
-
 upload_2018-8-28_18-12-5.png
 -
 upload_2018-8-28_18-13-39.png
 -
 upload_2018-8-28_18-26-44.png
 -
 upload_2018-8-28_18-34-46.png
 -
 upload_2018-8-28_19-37-42.png
 -
 upload_2018-8-28_19-38-9.png
 -
 upload_2018-8-28_19-39-32.png