Greetings,
In the last two guides, I have demonstrated how to Install the WDS Role and Configure WDS, see below for previous guides:
Part 1
Installing and Configuring WDS for Windows Server 2016
Part 2
Configuring WDS for Windows Server 2016
Things you will need:
In this guide, I will be walking through how to create a boot image and capture image. Some of you might be asking, what are these and what are they used for?
Boot Image:
A boot image is essentially a WindowsPE (Preinstallation Envorimenent) which is a stripped down OS that only includes the necessary tools to install, deploy, and repair Windows. This image is necessary so that the Windows Installation media has something to boot off of, thus why it's called a boot image.
Capture Image:
A capture Image is required for an environment where you are deploying similar Operating Systems that contain the same basic applications. The image is used to create a capture image.
Install Image:
An install image is the image that was captured from the Capture Image and contains all the settings and applications that were installed and configured from a reference computer.
Lets start!
Creating a boot image:
1) On the WDS server, open the Windows Deployment Services Management Console by clicking tools in server manager then Windows Deployment Services:

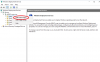
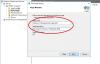
2) Expand Servers > [Your Server] and right click on boot image, click Add boot Image:

3) Browse to the Windows ISO you have downloaded, right click the ISO and select mount:

4) Once the ISO is mounted, browse to the Sources folder and search for the boot.wim file:

5) Copy the boot.wim file and save it somewhere on your C drive. I have it saved under C:\common$:

6) In the add image wizard we were previously on, browse to the boot.wim file you copied over and click open:

7) Leave this as default and click Next:

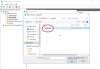
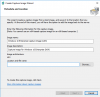
8) Specify the image name and give it a description, click Next:

9) On the "Summary" Window, click Next:

10) A task progress windows will appear, it will notify if it ran into any errors during the boot image creation process or if it completed successfully, click Finish:

Once completed, you should see the image under appear under Boot Images in the Windows Deployment Services Management Console:

Congratulations, you have just created a boot image! Now it's time to create a capture image.
Creating a capture image:
1) Right click on the boot image and select Create Capture Image:

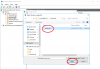
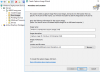
2) Give the image an name, add a description:

3) For location and file name, click browse and browse to where you have decided to store the remoteinstall folder we did in the last guide:

4) Right click anywhere in the directory and choose New > Folder and name it Capture:

5) Click on the folder and give your capture image a name, and click Open

6) Click Next:

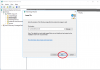
7) After clicking next, the capture image creation progress will begin. When completed, it will notify you that the image has been successfully created, click Finish:

Congratulations, you have just created a capture image. In the next guide, I will demonstrate how to sysprep a reference computer and create an install image. Make sure to keep an eye out for my next guide!
If you have you any questions, comments, or concerns, please don't hesitate to contact me.
Sincerely,
Mog
In the last two guides, I have demonstrated how to Install the WDS Role and Configure WDS, see below for previous guides:
Part 1
Installing and Configuring WDS for Windows Server 2016
Part 2
Configuring WDS for Windows Server 2016
Things you will need:
- Windows 10 ISO: For instructions on how to download the tool, check of the following guide by clicking here.
- A reference computer that is built, configured, and loaded with the desire applications.
In this guide, I will be walking through how to create a boot image and capture image. Some of you might be asking, what are these and what are they used for?
Boot Image:
A boot image is essentially a WindowsPE (Preinstallation Envorimenent) which is a stripped down OS that only includes the necessary tools to install, deploy, and repair Windows. This image is necessary so that the Windows Installation media has something to boot off of, thus why it's called a boot image.
Capture Image:
A capture Image is required for an environment where you are deploying similar Operating Systems that contain the same basic applications. The image is used to create a capture image.
Install Image:
An install image is the image that was captured from the Capture Image and contains all the settings and applications that were installed and configured from a reference computer.
Lets start!
Creating a boot image:
1) On the WDS server, open the Windows Deployment Services Management Console by clicking tools in server manager then Windows Deployment Services:
2) Expand Servers > [Your Server] and right click on boot image, click Add boot Image:
3) Browse to the Windows ISO you have downloaded, right click the ISO and select mount:
4) Once the ISO is mounted, browse to the Sources folder and search for the boot.wim file:
5) Copy the boot.wim file and save it somewhere on your C drive. I have it saved under C:\common$:
6) In the add image wizard we were previously on, browse to the boot.wim file you copied over and click open:
7) Leave this as default and click Next:
8) Specify the image name and give it a description, click Next:
9) On the "Summary" Window, click Next:
10) A task progress windows will appear, it will notify if it ran into any errors during the boot image creation process or if it completed successfully, click Finish:
Once completed, you should see the image under appear under Boot Images in the Windows Deployment Services Management Console:
Congratulations, you have just created a boot image! Now it's time to create a capture image.
Creating a capture image:
1) Right click on the boot image and select Create Capture Image:
2) Give the image an name, add a description:
3) For location and file name, click browse and browse to where you have decided to store the remoteinstall folder we did in the last guide:
4) Right click anywhere in the directory and choose New > Folder and name it Capture:
5) Click on the folder and give your capture image a name, and click Open
6) Click Next:
7) After clicking next, the capture image creation progress will begin. When completed, it will notify you that the image has been successfully created, click Finish:
Congratulations, you have just created a capture image. In the next guide, I will demonstrate how to sysprep a reference computer and create an install image. Make sure to keep an eye out for my next guide!
If you have you any questions, comments, or concerns, please don't hesitate to contact me.
Sincerely,
Mog
-
 upload_2018-8-28_20-23-45.png
 -
 upload_2018-8-28_21-4-26.png
 -
 upload_2018-8-28_21-5-36.png
 -
 upload_2018-8-28_21-6-26.png
 -
 upload_2018-8-28_21-8-10.png
 -
 upload_2018-8-29_18-31-30.png
 -
 upload_2018-8-29_18-43-1.png