This works well in the W10 pro.
{ Note if you have W10 home edition go to method 2
*********************************************************************************************************************
NOTE: Windows 10 Home edition doesn't contain Group Policy Editor. If you are using Home edition, check out METHOD 2. Other edition users can follow METHOD 1.
1. Type
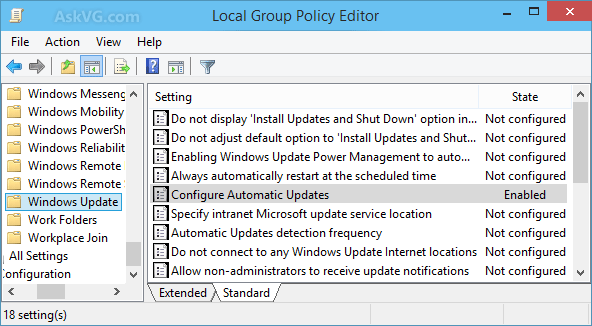
gpedit.msc in RUN or Start search box and press Enter. It'll open
Group Policy Editor.
2. Now go to:
Computer Configuration -> Administrative Templates -> Windows Components -> Windows Update
3. In right-side pane, look for "
Configure Automatic Updates" option.
4. The option would be set to
Not Configured. Double-click on it and set it to
Enabled.
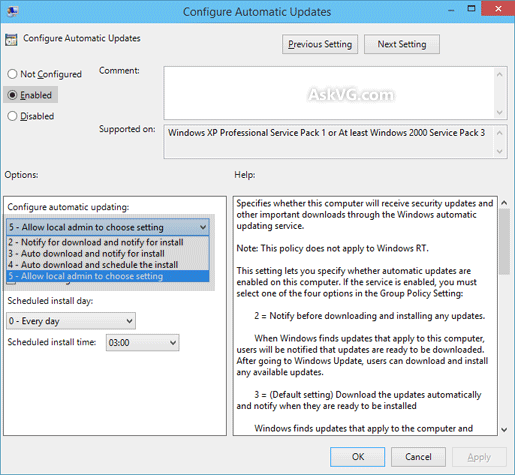
Now select any of the given options according to your requirements:
- 2 - Notify for download and notify for install
- 3 - Auto download and notify for install
- 4 - Auto download and schedule the install
- 5 - Allow local admin to choose setting
PS: Select the last option "
5 - Allow local admin to choose setting" to be able to choose options in drop-down box on Windows Update settings page.
That's it. Apply changes and open Windows Update settings page. Now you'll be able to change desired settings.
NOTE for Windows 10 Users:
After applying changes in Group Policy Editor, open Windows Update page in Settings app. Now click on "
Check for updates" button to force Windows 10 to apply your changes. After that open Windows Update advanced options and you'll see the new settings have been applied successfully.
Further Read: Fixing Windows 10 Automatic Updates Install Problem
METHOD 2: Using Registry Editor (regedit.exe)
If you can't use or don't want to use Group Policy Editor, you can take help of Registry Editor for the same task. Just follow these simple steps:
1. Type
regedit in RUN or Start search box and press Enter. It'll open
Registry Editor.
2. Now go to following key:
HKEY_LOCAL_MACHINE\SOFTWARE\Policies\Microsoft\Windows
3. Create a new key under
Windows key and set its name as
WindowsUpdate
4. Create another new key under
WindowsUpdate key and set its name as
AU
So the final key path would be:
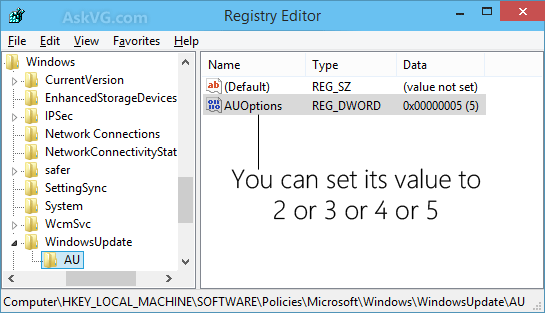
HKEY_LOCAL_MACHINE\SOFTWARE\Policies\Microsoft\Windows\WindowsUpdate\AU
5. Now select
AU key and in right-side pane create a new DWORD
AUOptions and set its value to any of following according to your requirements:
- 2 (To notify for download and notify for install)
- 3 (To auto download and notify for install)
- 4 (To auto download and schedule the install)
- 5 (To allow local admin to choose setting)
PS: Set the value of
AUOptions to
5 to be able to choose options in drop-down box on Windows Update settings page.
6. Close Registry Editor and open Windows Update settings page. Now you'll be able to change desired settings.
NOTE for Windows 10 Users:
After applying changes in Registry Editor, restart your computer. After reboot, open Windows Update page in Settings app. Now click on "
Check for updates" button to force Windows 10 to apply your changes. After that open Windows Update advanced options and you'll see the new settings have been applied successfully.


